Mind MAP
1. Decide as a group, what the main topic of your MIND MAP will be based on the Phenomena Question. It is okay for teams to choose different main topics, as long as the topic will guide your team to come up with the MOST AWESOME scientific explanation to answer the Phenomena Question.
2. Each member of the team will come up with four questions for the Mind Map. Once all team members have come up with their individual questions, team members should share their questions with their team members. If team members have the same questions, add additional questions to the mind map that will help you research the topic. Each team member should end up with 4 unique questions which they will research then ultimately share the answers with their team members.
Remember: You will be adding to the mind map as you go along. Answers to the initial questions should lead to additional questions, etc. Ultimately, based on what you have learned you should be able to answer the Phenomenon Question.
As you answer the questions, you will add branches and twigs to your mind map.
| jello_mind_map_checklist2017-11-01162719.526212.pdf |
Reviewing Solids, Liquids, and Gases
| solid-liquid-gas-phases-changes-venn-diagram-sorting-activity-public.jpg |
Textbook Reading
1. Read through the following page in our Online Textbook. Although we did this lab last year, look at it based on our phenomenon question. Once you have completed the reading, answer the questions at the end of the text in your science journal.
Just a Little More Reading...
1. Read through the page on Mixture, watch the video (if it shows up on your iPad) and then answer the questions at the bottom in your science journal.
2. Read through the page on Compounds, watch the video (if it shows up on your iPad) and then answer the questions at the bottom in your science journal.
WOW THAT HELPS!!!
3. Now complete the following form in WORD. On the PAGE 2 (NOT Page 1) of the document you will need to use TEXT BOXES. To do that, click on Insert (in the top menu); Click on the ico that looks like it is a box and has a T in it; put your figure on one of the boxes that you want to write in and make a box that is the same size; Click on edit text, and start typing your answer. There is a word bank at the bottom of the page of words you can use in your boxes.
| elementscompoundsandmixturesnotes__1_.docx |
4. When you have completed the share your document to your classroom's email address.
Getting to Know Elements a bit more...
Using the Periodic Table in your science binder, identify the symbol or the name of the element...
Classifying Matter...
Read It/Write About It - Article on Liquids
For this Phenomena Read Up and Write Up activity, you will choose an article in one of the online science magazines listed below that has to do with liquids. Read the article, then write up a summary. You can use any of the science magazines found in the Symbaloo found above, which include: Science Daily, Science News for Students, National Geographic, Science, Astronomy, National Geographic History, Live Science, or Smithsonian TweenTribune.
Your summary should include the following:
Type up your Read Up and Write Up assignment in Word. When naming your file you should put your first and last name, "Read UpWrite Up" and the name of the phenomena we are learning about. Here's an example of what the file name should look like: DebSmithReadUpWriteUpEclipse
You will use this same file name format for everything you turn in electronically.
Submit your assignment to your class' email address. If you're not sure what your class' email address is, check on the Resource Page of this website. Confirm with Mrs. Smith that she has received it.
You will receive feedback for your assignment within one week. Feel free to revise and resubmit the assignment based on the feedback you receive.
Your summary should include the following:
- Name of the article
- Author of the article
- Magazine where you found the article
- 50 + word summary of the article
- Three things you learned from reading the article
Type up your Read Up and Write Up assignment in Word. When naming your file you should put your first and last name, "Read UpWrite Up" and the name of the phenomena we are learning about. Here's an example of what the file name should look like: DebSmithReadUpWriteUpEclipse
You will use this same file name format for everything you turn in electronically.
Submit your assignment to your class' email address. If you're not sure what your class' email address is, check on the Resource Page of this website. Confirm with Mrs. Smith that she has received it.
You will receive feedback for your assignment within one week. Feel free to revise and resubmit the assignment based on the feedback you receive.
Symbaloo
LAB - Separating a Mixture of Elements and Compounds
PURPOSE: To learn the differences between and physical properties of mixtures and compounds, as well as to be able to understand how mixtures and are physically separated.
BEFORE STARTING: Decide on Jobs and have the Reader read through ALL of the Instructions. You will not be given more substances if you make a mistake or mishandle your substances!!!!!!!
JOBS: Job #1: Reader, recorder, and dry substance pourer; Job #2: Substance measurer and paper holder, conductivity measurer; Job #3: Magnet user and filtering apparatus builder (If you have 4 people on your team: Job #1 stays the same, Job#2 paper holder and conductivity measurer, Job #3: Liquid substance pourer and paper handler, Job #4: stays the same)
MATERIALS:
- Iron filings, Fe, 5g
- Sand, SiO2, 5 g
- Sodium chloride, NaCl, 5 g
- Zinc, mossy, Zn, 5 g
- Distilled Water, H2O, 50 mL
- 400 mL beaker
- 250 mL beaker
- Filter paper
- Funnel
- Magnetic wand
- Screen
- Sheet of notebook paper (student to provide)
- Stirring Rods
- Weighing papers (squares of paper)
1. Everyone will wear safety glasses during the lab
2. Everyone will wear gloves during the lab
3. Person pouring substances will wear an apron
4. EVERYONE WILL FOLLOW LAB AND CLASSROOM RULES; EVERYONE WILL READ THE SDS FOR EACH SUBSTANCE WE WILL USE TODAY
5. We will be using glass beakers, which need to be handled with great care!
6. We will be using a hot plate, which needs to be handled with great care!
7. Do not remove beaker after heating until the beaker is safe to touch (not too hot - will not burn you)
PROCEDURES:
1. In your science journal, write down the name of the lab and then create the following tables (Remember neatness counts!):
Table 1: Yield
4 columns by 5 rows
*Row #1 write in the column headings: Substance, Initial Mass in Grams (Before Mixing), Final Mass in Grams (After Separating), Percent Yield
*Column #1 in row #2 (under Substance) write Iron, in row #3 write Zinc, in row #4 write Sand, and in row #5 write Sodium Chloride
Table 2: Observations Before Mixing
2 columns by 5 rows
*Row #1 write in the column headings: Substance, Observations of Physical Properties
*Column #1 in row #2 (under Substance) write Iron, in row #3 write Zinc, in row #4 write Sand, and in row #5 write Sodium Chloride
Table 3: Observations After Mixing
2 columns by 7 rows
*Row #1 write in the column headings: Step Number, Observations
*Column #1 in row #2 (under Step Number), write Step 4; in row #3 write Step 5; in row #4 write Step 6; in row #5 write Step 7; in row #6 write Step 10, and in row #7 write Step 12.
Table 4: Mass
2 columns by 7 rows
*Row #1 write in the column headings: Material, Mass in Grams
* Column #1 in row #2 (under Material) write Filter Paper, in row #3 write Filter Paper plus material #3, in row #4 write Material #3, in row #5 write Empty 250-mL beaker, in row #6 write Beaker plus material #4, in row #7 write Material #4
INSTRUCTIONS: READ BEFORE DOING ANYTHING! YOU WILL NOT GET MORE CHEMICALS IF YOU MESS UP!!!!!!
Read all of the instructions. Be sure you understand a step before you do it!!!!
Step 1. Take a small square of paper and weigh out approximately 5 g of iron filings; using another square of paper weight out 5 g of mossy zinc; using yet another square of paper weight out 5 g of sand, and yet another square of paper and weigh out 5 g of sodium chloride. Record the exact mass of each material to the nearest tenth of a gram in Table 1.
Step 2. Carefully observe each of the four pure substances. Record observations of physical properties in Table 2. NOTE: BE VERY DESCRIPTIVE!!!!!
Step 3. Test each substance with a magnet. Run the magnet bar underneath each piece of paper holding a substance. Record these observations in Table 2.
Step 4. Use the glass stirrer to combine the four substances together in the 400-mL beaker. Record observations of the newly formed mixture in Table 3 (Step 4).
Step 5. Pour the prepared mixture onto one half of a whole sheet of notebook paper (NOTE: DO NOT CUT PAPER IN HALF, KEEP THE PAPER AS A WHOLE PIECE). Pass a magnet underneath the paper moving the magnetic materials to the clean half of the paper. Completely separate the magnetic material, collect it on a piece of weighing paper, re-mass it on the scale (re-mass it means to re-measure it) and then identify it. Record the mass in Table 1 and record observations of the separated material in Table 3 (Step 5).
Step 6. Place a screen on top of the 400 -mL beaker. Pour the remaining mixture (non-magnetic materials) onto the screen. Sift the mixture over the beaker so that the smaller particles fall through the screen and the larger particles remain on the screen. Separate and collect the material retained by the screen on a piece of weighing paper. Re-mass it on the scale and identify the material. Record the mass in Table 1 and record observations of the separated material in Table 3 (Step 6).
Step 7. Using the conductivity meter, measure the conductivity of the water before adding it to the mixture in the beaker. Add about 50 mL of distilled water to the beaker containing the remaining mixture and swirl the beaker gently. Using the conductivity meter, test the conductivity of the mixture. Record readings and observations in Table 3 (Step 7).
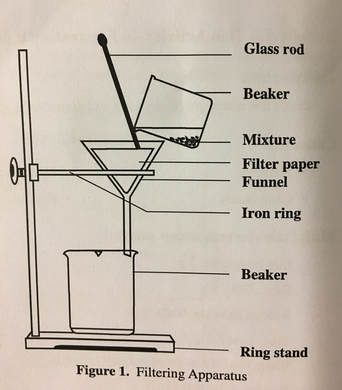
Step 8. Measure the mass of a piece of filter paper and record this mass in Table 4. Set up a filtering apparatus as shown in Figure 1.
Step 9. Measure the mass of an empty 250-mL beaker and record the mass in Table 4. Place the empty beaker underneath the funnel. Pour the contents of the 400-mL beaker into the funnel. Take care that no material is poured over the edges of the filter paper. Rinse this beaker and any solid it contains with about 10-mL of distilled water. Pour this rinse into the funnel.
Step 10. Observe the contents of the beaker and of the filter paper. Record observations in Table 3 (Step 10). Remove the filter paper from the funnel, unfold it and allow it to dry overnight. Put the filter paper on another piece of paper that has your team members names and class period. Put it on the counter by the window. Identify the material. NEXT DAY: When dry, measure the separated material on the filter paper. Record the mass in Table 4. Calculate the mass of the dry, separated material and transfer this mass to Table 1.
Step 11. Place the 250-mL beaker on a hot plate set at low-medium heat. Allow most of the liquid to evaporate. Turn the heat down if splattering occurs. When only a small bit of liquid remains (DO NOT LET THE LIQUID COMPLETELY EVAPORATE!), turn off the heat and allow the remaining liquid to evaporate. After the beaker is cool enough to touch, put the beaker on the same piece of paper that you have put your filter on to dry.
Step 12: NEXT DAY: When the beaker is cool and dry, examine the contents, identify the material, and record observations in Table 3 (Step 12). Measure the mass of the beaker plus the separated material (material #4) and record the mass in Table 4. Calculate the mass of the dry separated material and transfer this mass to Table 1.
CLEAN UP DAY ONE:
EVERYONE HELPS CLEAN UP!
1. Be sure that the hot plate has been turned off!!!
2. Plug the sink with the stopper and fill the sink part way. Squirt a nickel size amount of soap in the water. Using the sponge was out the large beaker, the funnel and the glass stirring stick. Rinse these items with water and place them in the dish rack to dry.
3. Wipe off the base of the ring stand, the scale, and your team's work area with a damp (not soaking wet) sponge. Once you have finished using the water in the sink, let out the water and rinse out the sink. The sink should be clean.
4. Put a clean 250-mL beaker, clean 400-mL beaker, and new piece of filter paper on your tray.
5. Retrieve the funnel (dry with cloth if not dry already) and the glass stirring stick (dry with cloth if not dry already) on your tray.
6. Make sure that you have logged out of your iPad properly and returned it to the proper bin.
7. Put away your science journal and science binder to the correct crate.
8. Be sure that your entire area is clean. Sit at your table so that your area and supplies can be inspected. NO ONE LEAVES UNTIL YOUR AREA IS CLEAN!
CLEAN UP DAY TWO:
1. Throw away filter paper when done with the lab.
2. Plug the sink with the stopper and fill the sink part way. Squirt a nickel size amount of soap in the water. Using the sponge was out the beaker. Place the beaker in the dish rack to dry.
3. Throw away paper that held your team's filter paper and beaker.
4. Once you have finished using the water in the sink, let out the water and rinse out the sink. The sink should be clean.
5. Make sure that you have logged out of your iPad properly and returned it to the proper bin.
6. Put away your science journal and science binder to the correct crate.
7. Be sure that your entire area is clean. Sit at your table so that your area and supplies can be inspected. NO ONE LEAVES UNTIL YOUR AREA IS CLEAN!
Step 1. Take a small square of paper and weigh out approximately 5 g of iron filings; using another square of paper weight out 5 g of mossy zinc; using yet another square of paper weight out 5 g of sand, and yet another square of paper and weigh out 5 g of sodium chloride. Record the exact mass of each material to the nearest tenth of a gram in Table 1.
Step 2. Carefully observe each of the four pure substances. Record observations of physical properties in Table 2. NOTE: BE VERY DESCRIPTIVE!!!!!
Step 3. Test each substance with a magnet. Run the magnet bar underneath each piece of paper holding a substance. Record these observations in Table 2.
Step 4. Use the glass stirrer to combine the four substances together in the 400-mL beaker. Record observations of the newly formed mixture in Table 3 (Step 4).
Step 5. Pour the prepared mixture onto one half of a whole sheet of notebook paper (NOTE: DO NOT CUT PAPER IN HALF, KEEP THE PAPER AS A WHOLE PIECE). Pass a magnet underneath the paper moving the magnetic materials to the clean half of the paper. Completely separate the magnetic material, collect it on a piece of weighing paper, re-mass it on the scale (re-mass it means to re-measure it) and then identify it. Record the mass in Table 1 and record observations of the separated material in Table 3 (Step 5).
Step 6. Place a screen on top of the 400 -mL beaker. Pour the remaining mixture (non-magnetic materials) onto the screen. Sift the mixture over the beaker so that the smaller particles fall through the screen and the larger particles remain on the screen. Separate and collect the material retained by the screen on a piece of weighing paper. Re-mass it on the scale and identify the material. Record the mass in Table 1 and record observations of the separated material in Table 3 (Step 6).
Step 7. Using the conductivity meter, measure the conductivity of the water before adding it to the mixture in the beaker. Add about 50 mL of distilled water to the beaker containing the remaining mixture and swirl the beaker gently. Using the conductivity meter, test the conductivity of the mixture. Record readings and observations in Table 3 (Step 7).
Step 8. Measure the mass of a piece of filter paper and record this mass in Table 4. Set up a filtering apparatus as shown in Figure 1.
Step 9. Measure the mass of an empty 250-mL beaker and record the mass in Table 4. Place the empty beaker underneath the funnel. Pour the contents of the 400-mL beaker into the funnel. Take care that no material is poured over the edges of the filter paper. Rinse this beaker and any solid it contains with about 10-mL of distilled water. Pour this rinse into the funnel.
Step 10. Observe the contents of the beaker and of the filter paper. Record observations in Table 3 (Step 10). Remove the filter paper from the funnel, unfold it and allow it to dry overnight. Put the filter paper on another piece of paper that has your team members names and class period. Put it on the counter by the window. Identify the material. NEXT DAY: When dry, measure the separated material on the filter paper. Record the mass in Table 4. Calculate the mass of the dry, separated material and transfer this mass to Table 1.
Step 11. Place the 250-mL beaker on a hot plate set at low-medium heat. Allow most of the liquid to evaporate. Turn the heat down if splattering occurs. When only a small bit of liquid remains (DO NOT LET THE LIQUID COMPLETELY EVAPORATE!), turn off the heat and allow the remaining liquid to evaporate. After the beaker is cool enough to touch, put the beaker on the same piece of paper that you have put your filter on to dry.
Step 12: NEXT DAY: When the beaker is cool and dry, examine the contents, identify the material, and record observations in Table 3 (Step 12). Measure the mass of the beaker plus the separated material (material #4) and record the mass in Table 4. Calculate the mass of the dry separated material and transfer this mass to Table 1.
CLEAN UP DAY ONE:
EVERYONE HELPS CLEAN UP!
1. Be sure that the hot plate has been turned off!!!
2. Plug the sink with the stopper and fill the sink part way. Squirt a nickel size amount of soap in the water. Using the sponge was out the large beaker, the funnel and the glass stirring stick. Rinse these items with water and place them in the dish rack to dry.
3. Wipe off the base of the ring stand, the scale, and your team's work area with a damp (not soaking wet) sponge. Once you have finished using the water in the sink, let out the water and rinse out the sink. The sink should be clean.
4. Put a clean 250-mL beaker, clean 400-mL beaker, and new piece of filter paper on your tray.
5. Retrieve the funnel (dry with cloth if not dry already) and the glass stirring stick (dry with cloth if not dry already) on your tray.
6. Make sure that you have logged out of your iPad properly and returned it to the proper bin.
7. Put away your science journal and science binder to the correct crate.
8. Be sure that your entire area is clean. Sit at your table so that your area and supplies can be inspected. NO ONE LEAVES UNTIL YOUR AREA IS CLEAN!
CLEAN UP DAY TWO:
1. Throw away filter paper when done with the lab.
2. Plug the sink with the stopper and fill the sink part way. Squirt a nickel size amount of soap in the water. Using the sponge was out the beaker. Place the beaker in the dish rack to dry.
3. Throw away paper that held your team's filter paper and beaker.
4. Once you have finished using the water in the sink, let out the water and rinse out the sink. The sink should be clean.
5. Make sure that you have logged out of your iPad properly and returned it to the proper bin.
6. Put away your science journal and science binder to the correct crate.
7. Be sure that your entire area is clean. Sit at your table so that your area and supplies can be inspected. NO ONE LEAVES UNTIL YOUR AREA IS CLEAN!
Chemical Reaction Lab
Lab Questions:
1. Define Chemical Reaction
2. What chemical reactions did you observe during the lab?
3. Do you think that making Jello involves and chemical reactions? If so what, describe.
4. Define Physical Reaction
5. Do you think that making Jello involves any physical reactions? If so what, describe.
6. What did you learn from the lab?
7. Write the balanced chemical equation for the reaction between aluminum foil and copper (II) chloride. (WE WILL DO THIS TOGETHER IN CLASS!)
8. What evidence do you have that a chemical reaction really occurred?
9. After mixing, is it possible to recover the original reactants (aluminium foil and copper (II) chloride by physical means? Why or Why not?
10. How might it be possible to separate a chemical compound into its component parts? Explain.
PhET: States of Matter-Basics, Part 1
INSTRUCTIONS:
1. Go to the PhET app on your iPad and search for "States of Matter-Basics"
2. Click on States.
3. In your science journal, create a table that has the title of "States of Matter". The table should have 4 columns entitled: Neon, Argon, Oxygen, and Water. There should be 6 rows entitled: Solid-Temperature, Solid-Description, Liquid-Temperature, Liquid-Description, Gas-Temperature, and Gas-Description
4. Using the app, test Neon, Argon, Oxygen, and Water. Record the temperature for each of the states of matter.
5. Write a summary of your findings.
6. Write down the type of Causal Pattern you have seen demonstrated. Explain why you have chosen this causal pattern.
7. Write down how this information applies to our Phenomenon Question.
PhET: States of Matter-Basics, Part 2
Write down the type of Causal Pattern you have seen demonstrated. Explain why you have chosen this causal pattern.
7. Write down how this information applies to our Phenomenon Question.INSTRUCTIONS:
1. Go to the PhET app on your iPad and search for "States of Matter-Basics"
2. Click on Phase Changes.
3. In your science journal, create a table that has the title "Phase Changes." The table should have 4 columns entitled: Neon, Argon, Oxygen, and Water. There should be 9 rows entitled: Cool - Temperature, Cool - Pressure, Cool - Description (MAKE BIG), Neutral - Temperature, Neutral - Pressure, Neutral - Description (MAKE BIG), Heat - Temperature, Heat - Pressure, Heat - Description (MAKE BIG).
4. Using the app, we will test Neon, Argon, Oxygen, and Water.
5. Click on Neon. Notice that the temperature bucket at the bottom of the window is in the neutral (middle) position. Look at the temperature on the thermometer and the pressure gauge. Write the data in the table. What are the atoms in the tank doing? Write a description in the table. Now using the pump, pump more atoms into the tank. Do the atoms act differently? What are the new atoms doing? Write the answer to these questions in the description box as well.
6. Click on Argon and go through the same investigation. Enter your data and description in your table.
7. Click on Oxygen and go through the same investigation. Enter your data and description in your table.
8. Click on Water and go through the same investigation. Enter your data and description in your table.
9. Write a summary of your findings.
10. Write down the type of Causal Pattern you have seen demonstrated. Explain why you have chosen this causal pattern.
11. Write down how this information applies to our Phenomenon Question.
"Finally Jello!" Lab
Option #1 Instructions
1. Create your own lab(s) to answer the phenomenon question. Must have Mrs. Smith's approval on lab(s) before getting materials or starting lab(s).
2. Complete the Form below.
3. Get Mrs. Smith's approval before starting.
REMEMBER YOU ONLY HAVE THREE DAYS - Which includes your conclusions, tables, and answers
2. Complete the Form below.
3. Get Mrs. Smith's approval before starting.
REMEMBER YOU ONLY HAVE THREE DAYS - Which includes your conclusions, tables, and answers
Option One - Questions, etc.
1. REMEMBER TO COLLECT DATA! You will need it to answer questions and to write conclusion
2. What did you learn from doing this lab? What evidence did you collect that backs up your answer?
3. How did this lab apply to the phenomenon? (Solid or Liquid or Gas?)
4. During the experiment did you have a chemical or physical reaction occur? Explain what happened in great detail and include your proof for the type of reaction that occurred.
5. What evidence have you collected that will help you answer the final answer to the phenomenon?
6. What did you learn about doing experiments from this experience?
7. Did all team members participate equally, if yes, explain. If no, explain.
Option #2 - Instructions
1. You will need to get your supplies and instructions from Mrs. Smith.
2. You will be conducting two experiments in the next three days. One experiment involving solids vs liquids and a second experiment involving trying to turn Jello into a gas...
2. You will be conducting two experiments in the next three days. One experiment involving solids vs liquids and a second experiment involving trying to turn Jello into a gas...
Option Two - Questions
1. Based on the data you collected for the Solid vs Liquid lab, did you decide whether or not Jello, in its intended, final form is a solid or a liquid? What evidence do you have to back up your conclusion?
2. What makes a solid a solid?
3. What makes a liquid a liquid?
4. What properties make up a solid?
5. What properties make up a liquid?
6. What does the term dissolve mean? Did you see anything dissolve?
7. Did a chemical or physical change happen during the "Solid vs Liquid" experiment? Explain which one occurred and the evidence that you have to back up your observation of the change. If more than one occurred, then explain each change and the evidence that you have that it occurred.
8. Based on the data and observations you collected for the "Can Jello Turn To Gas?" experiment, what is your conclusion, and the evidence to back it up?
9. What makes a gas a gas?
10. Did a chemical or physical change happen during the "Can Jello Turn to Gas?" experiment? Explain which one occurred, and the evidence that you have to back up your observation of the change. If more than one occurred, then explain each change and the evidence that you have that it occurred.
11. What did you learn from doing these labs and how has it helped you to answer the phenomenon question.
12. How well did your team work together, explain with examples.
Ice, Tap Water, Boiling Water - How alike are they? - Lab Activity
Materials
WARNING: The thermometer, scale, and beakers all will break very easily - HANDLE WITH GREAT CARE!
INSTRUCTIONS:
1. Decide who will be the reader of instructions and who will be the checker of work (the person who check to make sure that the team is ready to move on to the next question)
2. Everyone will create a table in your journal to record your data. The table should be five columns across by 4 rows down. Your headings for your columns should be: Item in Beaker, Temperature, Mass, Volume, Density (Row #1) In row number two, under Item in Beaker you should write, Ice. In row number 3, under Ice you should write Water. In row number 4, under Water you should write Boiling Water/Gas
3. Turn the Hot Plate to Medium Low (half way between Medium and Low settings).
4. You should have enough Ice to measure to the 200 ml mark on the beaker. CAREFULLY put the thermometer into the center of the beaker. The bottom of the thermometer should be resting in the middle of the ice, not on the bottom of the beaker. Leave the thermometer here for one minute or until the thermometer stops dropping in temperature. In Celcius, write down the temperature in the appropriate place on your data table.
5. You should now mass out the beaker with the ice. Don't forget to use the empty beaker to measure the mass of the beaker, so that you can determine the mass of the ice on its own. Record the mass in your data table.
6. To simplify the situation, record 200 ml for the volume for the ice.
7. Using the density formula you learned last year, now calculate the density for the ice. Density = Mass/Volume Don't forget to record the appropriate units for all measurements.
8. Return the Ice to Mrs. Smith in return for a beaker of water.
9. CAREFULLY put the thermometer into the center of the beaker with the water. The bottom of the thermometer should be resting in the middle of the water, not on the bottom of the beaker. Leave the thermometer here for one minute or until the thermometer stops changing temperature. In Celcius, write down the temperature in the appropriate place on your data table.
10. You should now mass out the beaker with the water. Don't forget to use the empty beaker to measure the mass of the beaker, so that you can determine the mass of the ice on its own. Record the mass in your data table.
11. Record 200 ml for the volume for the water.
12. Using the density formula you learned last year, now calculate the density for the water. Density = Mass/Volume Don't forget to record the appropriate units for all measurements.
13. Now place the beaker with the water on the hot plate. Record the starting temperature. After the water starts boiling, set the timer for 5 minutes. After 5 minutes, take the beaker off the hot plate - Turn off the hot plate! Estimate the amount of water left in the beaker (mL), record the data in your table. Take the temperature of the water. Mass the water. Determine the density of the boiling water.
14. Once you have gathered all of your data, look at your data. What patterns or trends are you detecting?
15. Answer the following questions:
a. Which state of H2O is the most dense? least dense? Why do you think this is? (IDK IS NOT AN ANSWER)
b. Which does temperature have to do with the different states of H2O?
c. What three science things did you learn from doing this lab?
16. Please return all of the materials to their appropriate place. Clean up the area where your team was working.
17. In your science journal. Draw a picture of ice and then draw what you think you would see if you could see the ice molecules. Draw of picture of the water in a beaker, then draw what you think you would see if you could see the water molecules. Finally, draw a picture of the boiling water/gas, then draw what you think you would see if you could see all of the gas and water molecules in the boiling water.
18. What does this lab have to do with our Phenomenon Question: "Is Jello a liquid or a solid, and can it be turned into gas?"
19. Were there any phase changes in the lab? If so, what were they?
20. What causal pattern is at work in this lab? Explain your reason for your choice of causal patterns.
- Ice
- Tap Water
- Hot Plate
- Thermometer
- Scale
- Beakers
- Science Journal
- Pencil
- Ruler
- Timer
WARNING: The thermometer, scale, and beakers all will break very easily - HANDLE WITH GREAT CARE!
INSTRUCTIONS:
1. Decide who will be the reader of instructions and who will be the checker of work (the person who check to make sure that the team is ready to move on to the next question)
2. Everyone will create a table in your journal to record your data. The table should be five columns across by 4 rows down. Your headings for your columns should be: Item in Beaker, Temperature, Mass, Volume, Density (Row #1) In row number two, under Item in Beaker you should write, Ice. In row number 3, under Ice you should write Water. In row number 4, under Water you should write Boiling Water/Gas
3. Turn the Hot Plate to Medium Low (half way between Medium and Low settings).
4. You should have enough Ice to measure to the 200 ml mark on the beaker. CAREFULLY put the thermometer into the center of the beaker. The bottom of the thermometer should be resting in the middle of the ice, not on the bottom of the beaker. Leave the thermometer here for one minute or until the thermometer stops dropping in temperature. In Celcius, write down the temperature in the appropriate place on your data table.
5. You should now mass out the beaker with the ice. Don't forget to use the empty beaker to measure the mass of the beaker, so that you can determine the mass of the ice on its own. Record the mass in your data table.
6. To simplify the situation, record 200 ml for the volume for the ice.
7. Using the density formula you learned last year, now calculate the density for the ice. Density = Mass/Volume Don't forget to record the appropriate units for all measurements.
8. Return the Ice to Mrs. Smith in return for a beaker of water.
9. CAREFULLY put the thermometer into the center of the beaker with the water. The bottom of the thermometer should be resting in the middle of the water, not on the bottom of the beaker. Leave the thermometer here for one minute or until the thermometer stops changing temperature. In Celcius, write down the temperature in the appropriate place on your data table.
10. You should now mass out the beaker with the water. Don't forget to use the empty beaker to measure the mass of the beaker, so that you can determine the mass of the ice on its own. Record the mass in your data table.
11. Record 200 ml for the volume for the water.
12. Using the density formula you learned last year, now calculate the density for the water. Density = Mass/Volume Don't forget to record the appropriate units for all measurements.
13. Now place the beaker with the water on the hot plate. Record the starting temperature. After the water starts boiling, set the timer for 5 minutes. After 5 minutes, take the beaker off the hot plate - Turn off the hot plate! Estimate the amount of water left in the beaker (mL), record the data in your table. Take the temperature of the water. Mass the water. Determine the density of the boiling water.
14. Once you have gathered all of your data, look at your data. What patterns or trends are you detecting?
15. Answer the following questions:
a. Which state of H2O is the most dense? least dense? Why do you think this is? (IDK IS NOT AN ANSWER)
b. Which does temperature have to do with the different states of H2O?
c. What three science things did you learn from doing this lab?
16. Please return all of the materials to their appropriate place. Clean up the area where your team was working.
17. In your science journal. Draw a picture of ice and then draw what you think you would see if you could see the ice molecules. Draw of picture of the water in a beaker, then draw what you think you would see if you could see the water molecules. Finally, draw a picture of the boiling water/gas, then draw what you think you would see if you could see all of the gas and water molecules in the boiling water.
18. What does this lab have to do with our Phenomenon Question: "Is Jello a liquid or a solid, and can it be turned into gas?"
19. Were there any phase changes in the lab? If so, what were they?
20. What causal pattern is at work in this lab? Explain your reason for your choice of causal patterns.
Quizlet Cards
Dissolve
Gas
Liquid
Solid
Matter
Chemical Reaction
Physical Change
Density
Flammability
Malleability
Solubility
Rust
Odor
Matter is Conserved
Function
Properties of Matter
Viscosity
Colloid
Gas
Liquid
Solid
Matter
Chemical Reaction
Physical Change
Density
Flammability
Malleability
Solubility
Rust
Odor
Matter is Conserved
Function
Properties of Matter
Viscosity
Colloid
