Standard we are learning during this phenomenon: 8.1.2
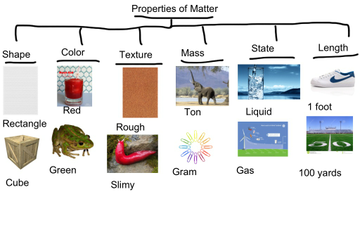
Obtain information about various properties of matter, evaluate how different materials’ properties allow them to be used for particular functions in society and communicate your findings. Emphasize general properties of matter. Examples could include color, density, flammability, hardness, malleability, odor, ability to rust, solubility, state, or the ability to react with water.
INITIAL ANSWER
1. As a class decide which of the following phenomenon questions your class will be working on:
2. Once the class has decided on a question, write the question in your science journal and write an answer to go with the question based on what you know right now.
- Why is mercury used in thermometers?
- Why is steel used to build office buildings?
- Why is helium used to fill weather balloons?
- Why is neon used for signs?
- Why is copper the major ingredient (91%) when making dimes?
- Why are diamonds often used in jewelry?
- Why is aluminum used to make soda cans?
2. Once the class has decided on a question, write the question in your science journal and write an answer to go with the question based on what you know right now.
Initial Answer Poster
1. Decide which team member will do what job today.
2. Take turns sharing your initial answer with your team
3. Put your answers together to create a poster to present to the class.
2. Take turns sharing your initial answer with your team
3. Put your answers together to create a poster to present to the class.
5 Questions/5 Answers
1. Think of 5 questions that will help us answer our Phenomenon Question: What is the Ring of Fire and how does it work?
2. Write these questions inside of your science journal
3. Research the answers to these questions and write the answers in your science journal
2. Write these questions inside of your science journal
3. Research the answers to these questions and write the answers in your science journal
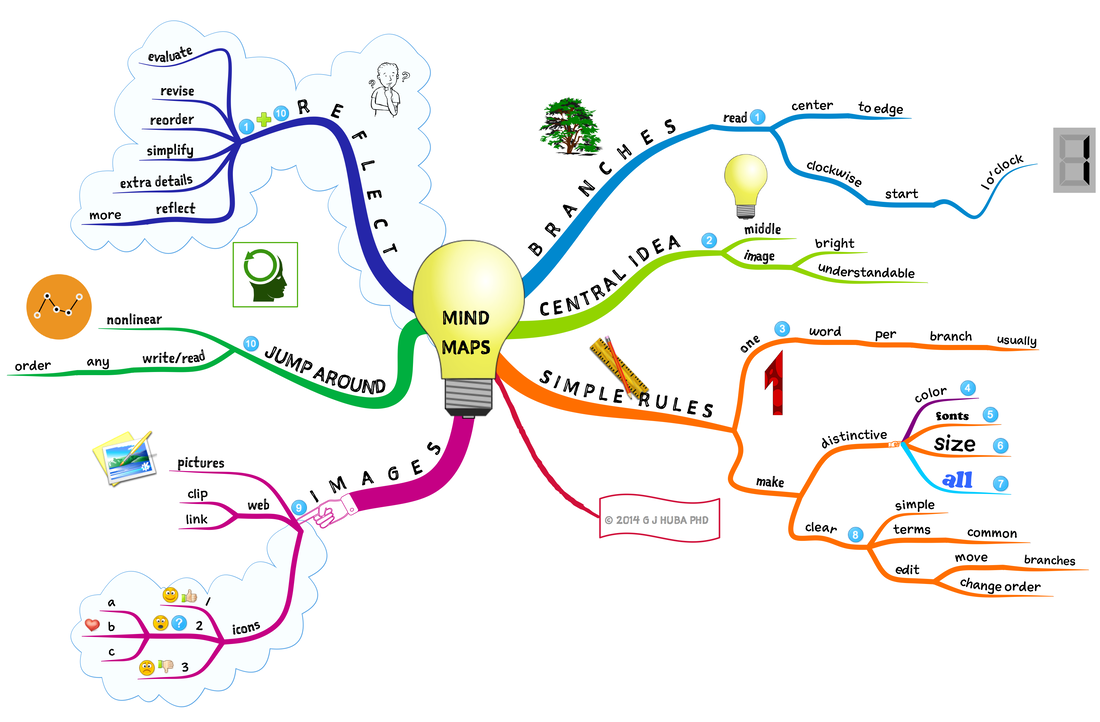
MindMap
1. Write the Phenomenon Question in the center of a blank piece of paper. Put a shape around the question
2. Draw 5 lines coming out of the shape/question
3. Pick a keyword from each of your questions and write a keyword on each of these lines
4. Now looking at the answers you've found, see if you can add additional keywords to the lines you have started on your MindMap
Below is a sample of a MindMap:
2. Draw 5 lines coming out of the shape/question
3. Pick a keyword from each of your questions and write a keyword on each of these lines
4. Now looking at the answers you've found, see if you can add additional keywords to the lines you have started on your MindMap
Below is a sample of a MindMap:
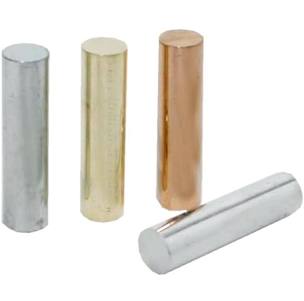
Heavy Metal Density Lab
|
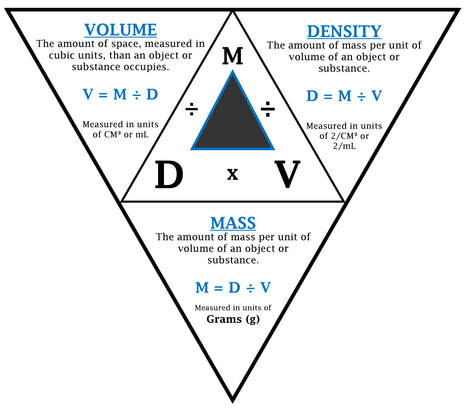
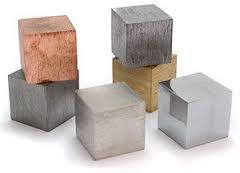
Introduction:The density formula (Mass divided by Volume; or M/V = D) allows us to compare different items in the same way. We are going to investigate some metal cubes and cylinders. These cubes and cylinders may have different mass’, volumes, and densities. Can you predict these measurements? If you could see the particles that make up these metal cubes and cylinders what would they look like?
Review the definitions for Mass, Volume, and Density with your team members. SEE THE TRIANGLE. Be sure you understand these definitions. Prediction/Hypothesis (Write the lab title and the predictions in your science journal): Which cube do you think will have the greatest mass? Which cube do you think will have the least density? Which cylinder do you think will have the greatest mass? Which cylinder do you think will have the least density? Procedures:
|
How to use Displacement to measure Volume...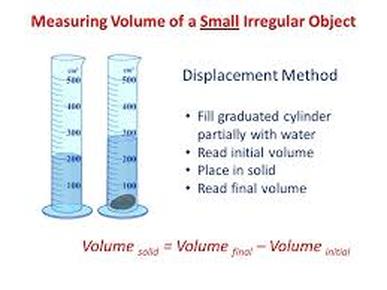
| ||
Liquid Density Lab
Learning Objectives:
1. TEAM: Decide who will do what job
2. Decide who will read the instructions. Read all of the instructions before starting the lab!
3. Put on Goggles
4. Resource Manager Collects Collecting Beaker and First Liquid
5. The volume has already been measured
6. Team takes turns massing each liquid on the scale and EVERYONE records the data on the Liquid Density Table. (NOTE: to get the mass of the liquid you must subtract the mass of the beaker the liquid is in - see white board for information)
7. Team takes turns carefully pouring liquid down the side of the collecting beaker
DO NOT STIR OR MIX LIQUIDS IN ANY WAY. KEEP COLLECTING BEAKER STILL.
8. Follow the instructions #4 - 7 until you have measured, recorded data, and collected the 5 liquids.
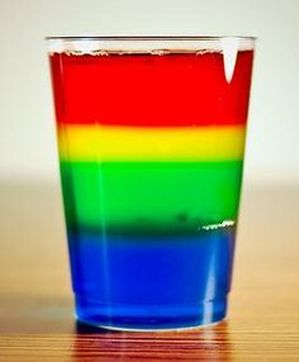
9. Draw a picture of the layered liquid beaker in your science journal - identity each of the liquids.
10. Using the calculator, figure out what the density is of each liquid. HINT: Mass/Volume = Density
11. High five your team members for a LAB well done.
12. All team members help clean-up the lab.
- To explore the relationship between matter and mass, volume, and density
- Goggles
- Pencil
- 5 different liquids
- Scale
- LARGE Beaker to collect liquids
- Calculator
- Lab Table to collect data
- Science Journal
- Glue Stick
1. TEAM: Decide who will do what job
2. Decide who will read the instructions. Read all of the instructions before starting the lab!
3. Put on Goggles
4. Resource Manager Collects Collecting Beaker and First Liquid
5. The volume has already been measured
6. Team takes turns massing each liquid on the scale and EVERYONE records the data on the Liquid Density Table. (NOTE: to get the mass of the liquid you must subtract the mass of the beaker the liquid is in - see white board for information)
7. Team takes turns carefully pouring liquid down the side of the collecting beaker
DO NOT STIR OR MIX LIQUIDS IN ANY WAY. KEEP COLLECTING BEAKER STILL.
8. Follow the instructions #4 - 7 until you have measured, recorded data, and collected the 5 liquids.
9. Draw a picture of the layered liquid beaker in your science journal - identity each of the liquids.
10. Using the calculator, figure out what the density is of each liquid. HINT: Mass/Volume = Density
11. High five your team members for a LAB well done.
12. All team members help clean-up the lab.
Density FINDINGS
Now that we have seen the affects of density on solids and liquids we need to record our FINDINGS.
INDIVIDUALLY:
1. Look at data tables for each of the last two labs. Look at the relationships between Mass, Volume, and Density.
2. Write down the relationships you notice between Mass, Volume, and Density. Answer the following questions in your science journal:
4. Discuss your findings with your team members
5. Discuss your findings with the class.
INDIVIDUALLY:
1. Look at data tables for each of the last two labs. Look at the relationships between Mass, Volume, and Density.
2. Write down the relationships you notice between Mass, Volume, and Density. Answer the following questions in your science journal:
- When the volume is the same between solids, what do you notice about the mass and the density?
- When the volume is the same between liquids, what do you notice about the mass and the density?
- When the volume is larger than the mass (if you have a situation like this), what happens to the density?
- When the mass is larger than the volume, what happens to the density?
- Look at the various solid masses you have measured, find the smallest mass and the largest mass, how did density change?
- Look at the various liquid masses you have measured, find the smallest mass and the largest mass, how did density change? Did density change the same way for solids as it did for liquids?
4. Discuss your findings with your team members
5. Discuss your findings with the class.
Team Project on Properties of Matter
The standard we are learning about right now has to do with the properties of matter. Each team will pick be assigned to report on one of the properties matter which include:
INSTRUCTIONS:
1. Determine who will do what job during this project. Be sure that you know the responsibilities for your job and follow through. Students will be given a community grade based on their performance of their job responsibilites. Job descriptions can be found in the Team envelope on your table.
2. Divide up the research questions amongst team members. EVERYONE NEEDS TO TRACK THEIR SOURCES FOR THEIR ANSWERS! If you need help with this, ask Mrs. Smith.
3. Be sure that you find visuals that will help you describe the property, elements, and the examples you provide for your section of the presentation.
4. One person should set up a PowerPoint in OneDrive and share it with your team members. This will allow everyone access to the PowerPoint and allow everyone to work on their assigned section of the presentation.
5. Once everyone on your team has completed their portion of the presentation, go over the presentation as a team and make sure that you have checked it for spelling and grammar errors.
6. Practice your presentation as a team.
7. Each person will submit the presentation to Canvas, making a note in the note section as to what slides you completed.
8. The Reporter/Recorder will present their team's section of the presentation to the class.
SUGGESTED RESOURCES:
Chem4Kids.com
www.ptable.com
periodictable.com
webelements.com
www.wikipedia.com
PowerPoint Slides Should Have:
DUE: NOVEMBER 5th - END OF CLASS/ PRESENTATION WILL BE NOVEMBER 6th DURING CLASS
- Color and change of color
- Density
- Flammability
- Hardness
- Malleability
- Odor
- Ability to rust
- Solubility
- Change of state
- The ability to react with water
INSTRUCTIONS:
1. Determine who will do what job during this project. Be sure that you know the responsibilities for your job and follow through. Students will be given a community grade based on their performance of their job responsibilites. Job descriptions can be found in the Team envelope on your table.
2. Divide up the research questions amongst team members. EVERYONE NEEDS TO TRACK THEIR SOURCES FOR THEIR ANSWERS! If you need help with this, ask Mrs. Smith.
3. Be sure that you find visuals that will help you describe the property, elements, and the examples you provide for your section of the presentation.
4. One person should set up a PowerPoint in OneDrive and share it with your team members. This will allow everyone access to the PowerPoint and allow everyone to work on their assigned section of the presentation.
5. Once everyone on your team has completed their portion of the presentation, go over the presentation as a team and make sure that you have checked it for spelling and grammar errors.
6. Practice your presentation as a team.
7. Each person will submit the presentation to Canvas, making a note in the note section as to what slides you completed.
8. The Reporter/Recorder will present their team's section of the presentation to the class.
SUGGESTED RESOURCES:
Chem4Kids.com
www.ptable.com
periodictable.com
webelements.com
www.wikipedia.com
PowerPoint Slides Should Have:
- Title Page with Property being presented and team members names
- Take as many slides as necessary to cover the questions given
- Have as many photos, diagrams, graphs, etc. to help explain answers
- Have a reference page with a list of sources used to find your answers
DUE: NOVEMBER 5th - END OF CLASS/ PRESENTATION WILL BE NOVEMBER 6th DURING CLASS
Sand, Sodium Chloride, Iron Filings and Zinc Lab
SDS Safety Sheets - READ BEFORE LAB |
|
| ||||||||
PURPOSE: To learn the differences between and physical properties of mixtures and compounds, as well as to be able to understand how mixtures are physically separated.
BEFORE STARTING:
1. EVERYONE WEARS GOGGLES AND GLOVES
2. Decide on Jobs and have someone read through ALL of the Instructions. You will not be given more substances if you make a mistake or mishandle your substances!!!!!!! Messing around will mean you will be given an alternative assignment and will not do this lab!!!!!
3. Decide who will do each step of the lab
SAFETY PRECAUTIONS:
1. Everyone will wear safety glasses during the lab
2. Everyone will wear gloves during the lab
3. Person pouring substances will wear an apron
4. EVERYONE WILL FOLLOW LAB AND CLASSROOM RULES; EVERYONE WILL READ THE SDS FOR EACH SUBSTANCE WE WILL USE TODAY
5. We will be using glass beakers, which need to be handled with great care!
6. We will be using a hot plate, which needs to be handled with great care!
7. Do not remove beaker after heating until the beaker is safe to touch (not too hot - will not burn you)
MATERIALS:
- Iron filings, Fe, 5g
- Sand, SiO2, 5 g
- Sodium chloride, NaCl, 5 g
- Zinc, mossy, Zn, 5 g
- Distilled Water, H2O, 50 mL
- 400 mL beaker
- 250 mL beaker
- Filter paper
- Funnel
- Magnetic wand
- Screen
- Sheet of notebook paper (student to provide)
- Stirring Rods
- Weighing papers (squares of paper)
PROCEDURES:
1. Have the Recorder/Reporter person record all of the information in the tables. They will share it with their team members at the end of the lab, when we work on Findings and Conclusions as a class.
2. Read all of the instructions. Be sure you understand a step before you do it!!!!
Step 1. All substances have been measured out to 5g per substance and recorded on Table 1 for you.
Step 2. Carefully observe each of the four pure substances. Record observations of physical properties in Table 2. NOTE: BE VERY DESCRIPTIVE!!!!!
Step 3. Test each substance with a magnet. Run the magnet bar underneath each piece of paper holding a substance. Record these observations (Before Mixing Column) in Table 2.
Step 4. Use the glass stirrer to combine the four substances together in the 400-mL beaker. Record observations (After Mixing Column) of the newly formed mixture in Table 2.
Step 5. Pour the prepared mixture onto one half of a whole sheet of notebook paper (NOTE: DO NOT CUT PAPER IN HALF, KEEP THE PAPER AS A WHOLE PIECE). Pass a magnet underneath the paper moving the magnetic materials to the clean half of the paper. Completely separate the magnetic material, collect it on a piece of weighing paper, re-mass it on the scale (re-mass it means to re-measure it) and then identify it. Record the mass in Table 1 and record observations of the separated material in Table 3 (Step 5).
Step 6. Place a screen on top of the 400 -mL beaker. Pour the remaining mixture (non-magnetic materials) onto the screen. Sift the mixture over the beaker so that the smaller particles fall through the screen and the larger particles remain on the screen. Separate and collect the material retained by the screen on a piece of weighing paper. Re-mass it on the scale and identify the material. Record the mass in Table 1 .
Step 7. Add about 40 mL (you have 50 mL in your graduated cylinder - you will use 10mL later) of distilled water to the beaker containing the remaining mixture and swirl the beaker gently.
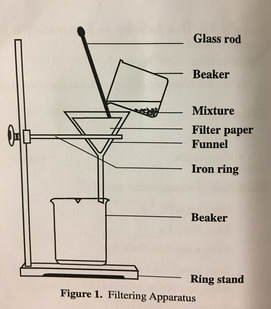
Step 8. Measure the mass of a piece of filter paper and record this mass in Table 4. Set up a filtering apparatus as shown in Figure 1.
Step 9. Measure the mass of an empty 250-mL beaker and record the mass in Table 4. Place the empty beaker underneath the funnel. SLOWLY Pour the contents of the 400-mL beaker into the funnel. DO NOT OVER FILL THE FUNNEL - BE PATIENT AND LET THE SUBSTANCE FLOW THROUGH! Take care that no material is poured over the edges of the filter paper. Rinse this beaker and any solid it contains with about 10-mL of distilled water. Pour this rinse into the funnel.
Step 10. Observe the contents of the beaker and of the filter paper. Record observations in Table 2. Remove the filter paper from the funnel, unfold it and allow it to dry overnight. Put the filter paper on another piece of paper that has your team members names and class period. Put it on the counter by the window. Identify the material.
DAY 2:
Step 11: When dry, measure the separated substance on the filter paper. Record the mass in Table 4. Calculate the mass of the dry, separated substance and transfer this mass to Table 1.
Step 12:. Place the 250-mL beaker on a hot plate set at low-medium heat. Allow most of the liquid to evaporate. Turn the heat down if splattering occurs. When only a small bit of liquid remains (DO NOT LET THE LIQUID COMPLETELY EVAPORATE!), turn off the heat and allow the remaining liquid to evaporate. After the beaker is cool enough to touch, put the beaker on the same piece of paper that you have put your filter on to dry.
DAY 3:
Step 13: When the beaker is cool and dry, examine the contents, identify the substance, and record observations in Table 2. Measure the mass of the beaker plus the separated substance (material #4) and record the mass in Table 4. Calculate the mass of the dry separated substance and transfer this mass to Table 1.
CLEAN UP DAY ONE:
EVERYONE HELPS CLEAN UP!
1. Filter paper and beaker with substance is placed on Paper from Mrs. Smith. Write team members names, and class period. Put the paper on the counter by the windows.
2. Iron filings should be returned to the demo table
3. Zinc pieces should be returned to the demo table
4. Orange tray should be placed in a stack on the back counter.
5. Clean the beaker that you have finished with by rinsing it out and putting it by the far left sink
6. iPads should be logged out and returned to proper basket
7. Science journals should be returned to class crate
8. Glue sticks should be returned to demo table
9. Wipe off the Ring Stand and Put the Ring Stand on the back counter
NO ONE LEAVES UNTIL YOUR AREA IS CLEAN!
CLEAN UP DAY TWO:
1. Be sure that the hot plate has been turned off!!!
2. Using the sponge was out the beaker, the funnel and the glass stirring stick. Rinse these items with water and place them in the dish rack to dry.
3. Wipe off the scale, and your team's work area with a damp (not soaking wet) sponge. Once you have finished using the water in the sink, let out the water and rinse out the sink. The sink should be clean.
4. Make sure that you have logged out of your iPad properly and returned it to the proper bin.
5. Put away your science journal in your class crate.
6. Be sure that your entire area is clean. Sit at your table so that your area and supplies can be inspected. NO ONE LEAVES UNTIL YOUR AREA IS CLEAN!
CLEAN UP DAY THREE:
1. Throw away filter paper when done with the lab.
2. Plug the sink with the stopper and fill the sink part way. Squirt a nickel size amount of soap in the water. Using the sponge was out the beaker. Place the beaker in the dish rack to dry.
3. Throw away paper that held your team's filter paper and beaker.
4. Once you have finished using the water in the sink, let out the water and rinse out the sink. The sink should be clean.
5. Make sure that you have logged out of your iPad properly and returned it to the proper bin.
6. Put away your science journal and science binder to the correct crate.
7. Be sure that your entire area is clean. Sit at your table so that your area and supplies can be inspected. NO ONE LEAVES UNTIL YOUR AREA IS CLEAN!
Step 1. All substances have been measured out to 5g per substance and recorded on Table 1 for you.
Step 2. Carefully observe each of the four pure substances. Record observations of physical properties in Table 2. NOTE: BE VERY DESCRIPTIVE!!!!!
Step 3. Test each substance with a magnet. Run the magnet bar underneath each piece of paper holding a substance. Record these observations (Before Mixing Column) in Table 2.
Step 4. Use the glass stirrer to combine the four substances together in the 400-mL beaker. Record observations (After Mixing Column) of the newly formed mixture in Table 2.
Step 5. Pour the prepared mixture onto one half of a whole sheet of notebook paper (NOTE: DO NOT CUT PAPER IN HALF, KEEP THE PAPER AS A WHOLE PIECE). Pass a magnet underneath the paper moving the magnetic materials to the clean half of the paper. Completely separate the magnetic material, collect it on a piece of weighing paper, re-mass it on the scale (re-mass it means to re-measure it) and then identify it. Record the mass in Table 1 and record observations of the separated material in Table 3 (Step 5).
Step 6. Place a screen on top of the 400 -mL beaker. Pour the remaining mixture (non-magnetic materials) onto the screen. Sift the mixture over the beaker so that the smaller particles fall through the screen and the larger particles remain on the screen. Separate and collect the material retained by the screen on a piece of weighing paper. Re-mass it on the scale and identify the material. Record the mass in Table 1 .
Step 7. Add about 40 mL (you have 50 mL in your graduated cylinder - you will use 10mL later) of distilled water to the beaker containing the remaining mixture and swirl the beaker gently.
Step 8. Measure the mass of a piece of filter paper and record this mass in Table 4. Set up a filtering apparatus as shown in Figure 1.
Step 9. Measure the mass of an empty 250-mL beaker and record the mass in Table 4. Place the empty beaker underneath the funnel. SLOWLY Pour the contents of the 400-mL beaker into the funnel. DO NOT OVER FILL THE FUNNEL - BE PATIENT AND LET THE SUBSTANCE FLOW THROUGH! Take care that no material is poured over the edges of the filter paper. Rinse this beaker and any solid it contains with about 10-mL of distilled water. Pour this rinse into the funnel.
Step 10. Observe the contents of the beaker and of the filter paper. Record observations in Table 2. Remove the filter paper from the funnel, unfold it and allow it to dry overnight. Put the filter paper on another piece of paper that has your team members names and class period. Put it on the counter by the window. Identify the material.
DAY 2:
Step 11: When dry, measure the separated substance on the filter paper. Record the mass in Table 4. Calculate the mass of the dry, separated substance and transfer this mass to Table 1.
Step 12:. Place the 250-mL beaker on a hot plate set at low-medium heat. Allow most of the liquid to evaporate. Turn the heat down if splattering occurs. When only a small bit of liquid remains (DO NOT LET THE LIQUID COMPLETELY EVAPORATE!), turn off the heat and allow the remaining liquid to evaporate. After the beaker is cool enough to touch, put the beaker on the same piece of paper that you have put your filter on to dry.
DAY 3:
Step 13: When the beaker is cool and dry, examine the contents, identify the substance, and record observations in Table 2. Measure the mass of the beaker plus the separated substance (material #4) and record the mass in Table 4. Calculate the mass of the dry separated substance and transfer this mass to Table 1.
CLEAN UP DAY ONE:
EVERYONE HELPS CLEAN UP!
1. Filter paper and beaker with substance is placed on Paper from Mrs. Smith. Write team members names, and class period. Put the paper on the counter by the windows.
2. Iron filings should be returned to the demo table
3. Zinc pieces should be returned to the demo table
4. Orange tray should be placed in a stack on the back counter.
5. Clean the beaker that you have finished with by rinsing it out and putting it by the far left sink
6. iPads should be logged out and returned to proper basket
7. Science journals should be returned to class crate
8. Glue sticks should be returned to demo table
9. Wipe off the Ring Stand and Put the Ring Stand on the back counter
NO ONE LEAVES UNTIL YOUR AREA IS CLEAN!
CLEAN UP DAY TWO:
1. Be sure that the hot plate has been turned off!!!
2. Using the sponge was out the beaker, the funnel and the glass stirring stick. Rinse these items with water and place them in the dish rack to dry.
3. Wipe off the scale, and your team's work area with a damp (not soaking wet) sponge. Once you have finished using the water in the sink, let out the water and rinse out the sink. The sink should be clean.
4. Make sure that you have logged out of your iPad properly and returned it to the proper bin.
5. Put away your science journal in your class crate.
6. Be sure that your entire area is clean. Sit at your table so that your area and supplies can be inspected. NO ONE LEAVES UNTIL YOUR AREA IS CLEAN!
CLEAN UP DAY THREE:
1. Throw away filter paper when done with the lab.
2. Plug the sink with the stopper and fill the sink part way. Squirt a nickel size amount of soap in the water. Using the sponge was out the beaker. Place the beaker in the dish rack to dry.
3. Throw away paper that held your team's filter paper and beaker.
4. Once you have finished using the water in the sink, let out the water and rinse out the sink. The sink should be clean.
5. Make sure that you have logged out of your iPad properly and returned it to the proper bin.
6. Put away your science journal and science binder to the correct crate.
7. Be sure that your entire area is clean. Sit at your table so that your area and supplies can be inspected. NO ONE LEAVES UNTIL YOUR AREA IS CLEAN!
Read or Watch About Matter and Properties
CLICK HERE to go to CK-12 and read about the basics of Matter and its Properties. When you are finished answer the questions at the end of the reading in your science journal. Title this assignment: Matter and Properties Reading
CLICK HERE to watch "Matter" and then CLICK HERE to watch "Properties of Matter" Take notes on BOTH videos. Title this assignment: Matter and Properties Videos
CLICK HERE to watch "Matter" and then CLICK HERE to watch "Properties of Matter" Take notes on BOTH videos. Title this assignment: Matter and Properties Videos
Properties of Matter Article Hunt
1. To help deepen your understanding of the Properties of Matter, use the online science magazines found on Symbaloo, such as Science Daily, Science News, National Geographic, Smithsonian TweenTribune, Live Science, Tween Tribune (Espanol), or BBC Bitesize Science to find an article that pertains to one of the following Properties of Matter THAT YOU DID NOT DO YOUR PRESENTATION ON (HINT: Search for one of these terms in the magazine search engine):
4. When finished with this assignment, move on to creating a Quizlet. See instructions below.
- Density
- Solubility
- Flammability
- Hardness
- Malleability
- Odor
- Solubility
- Sublimation
- Reaction to water
- Reaction to gas
- What type of Property of Matter is involved
- How is the Property of Matter involved
- What substances are involved
- What type of matter is involved
- Who, what, when, why, where, how in regards to the article itself
- Title of the article
- Magazine name
- Author if one is listed
4. When finished with this assignment, move on to creating a Quizlet. See instructions below.
QUIZLET
To join your class:
IF YOU ALREADY HAVE AN ACCOUNT:
Click on this link for 1st Period, log in and click on join class.
Click on this link for 2nd Period, log in and click on join class.
IF YOU DO NOT YET HAVE AN ACCOUNT:
Click on this link for 1st Period, set up new account. Do not use your real birthday.
Click on this link for 2nd Period, set up new account. Do not use your real birthday.
CLICK CREATE TO START A NEW SET OR THE + sign.
Instructions:
1. Define and give an example of the following words:
3. Don't forget to share your set with the class on Quizlet!
IF YOU ALREADY HAVE AN ACCOUNT:
Click on this link for 1st Period, log in and click on join class.
Click on this link for 2nd Period, log in and click on join class.
IF YOU DO NOT YET HAVE AN ACCOUNT:
Click on this link for 1st Period, set up new account. Do not use your real birthday.
Click on this link for 2nd Period, set up new account. Do not use your real birthday.
CLICK CREATE TO START A NEW SET OR THE + sign.
Instructions:
1. Define and give an example of the following words:
- Mass
- Weight
- Volume
- Density
- Solubility
- Flammability
- Hardness
- Malleability
- Odor
- Solubility
- Evaporation
- Sublimation
- Condensation
- Compound (science term)
- Mixture (science term)
- Chemical Reaction
- Physical Reaction
- Helium OR Neon (depending on whether you are in first period or second period)
3. Don't forget to share your set with the class on Quizlet!
CO2, Solution, Chemical Reaction, pH and Color Lab
Learning Objectives:
1. CO2 (carbon dioxide) gas reacts in water
2. Elements can change color
Demonstration:
1. Class will watch an amazing demonstration by Mrs. Smith and TAKE NOTES
2. Students answer the following questions in their science journal:
Materials:
1. Read the SDS on Universal Indicator Solution
2. EVERYONE has long sleeves, long pants, closed toed shoes and wears gloves and goggles throughout the lab - NO EXCEPTIONS
1. CO2 (carbon dioxide) gas reacts in water
2. Elements can change color
Demonstration:
1. Class will watch an amazing demonstration by Mrs. Smith and TAKE NOTES
2. Students answer the following questions in their science journal:
- Does blowing into the indicator solution change its pH?
- Does the solution become a little more acidic or a little more basic/alkali?
Materials:
- Universal Indicator Solution in 2 small clear plastic cups - 15mL each
- Distilled Water in wide clear plastic cup - 25 mL
- Carbonated Water in wide clear plastic cup - 25mL
- 2 taller clear plastic cups
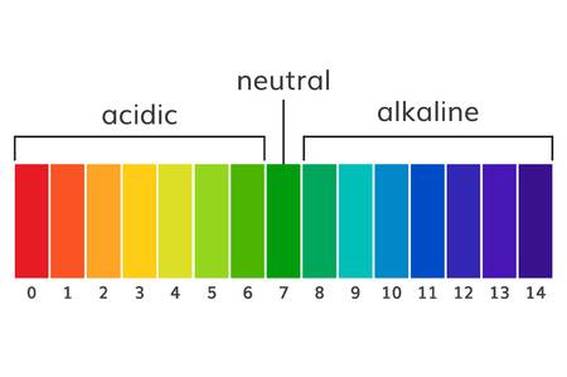
- Universal Indicator pH Color Chart
- Safety glasses for everyone
- Gloves for everyone
1. Read the SDS on Universal Indicator Solution
2. EVERYONE has long sleeves, long pants, closed toed shoes and wears gloves and goggles throughout the lab - NO EXCEPTIONS
|
| ||||
|
Procedures #1:
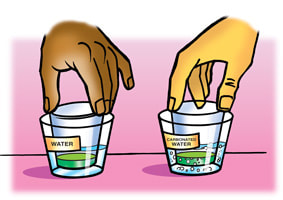
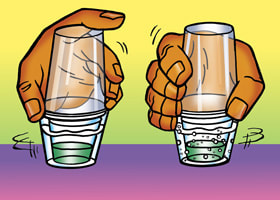
1. Be sure all team members have gloves and googles on. 2. Decide who will be the Facilitator, the Resource Manager, and the Reporter Recorder. 3. Down load lab sheet, open in Notability app. 4. READ THROUGH ALL INSTRUCTIONS BEFORE STARTING LAB!!!!!! 5. Carefully take the 2 small plastic cups with Universal Indicator Solution and set them in the two cups with carbonated water and distilled water (See Image 1) 6. Turn the 2 tall cups upside down and place them over the two wider cups (See Image 2)
7. While holding the top and bottom cups very carefully to keep them together, GENTLY swirl both sets of cups. Watch the color of the indicator in both cups to see if there is any change. 8. Using the pH Color Chart, find out whether the solution is acidic, neutral, or basic/alkali. 9. Resource Manager will take all cups with liquids to Mrs. Smith and pick materials for the next part of the lab. Keep the tall plastic cups.
Materials:
1. Pour the baking soda into one of the cups of vinegar. Do not pour anything into the other cup. 2. Gently put one of the small cups with universal indicator solution into each of the cups of vinegar as shown in Image #1 above. 3. Turn the two tall cups upside down and place them over the two wider cups. 4. Carefully, while holding the top and bottom cups, and keeping them together, GENTLY swirl both sets of cups as shown in Image #2 above. 5. Watch the color of the indicator solution in both cups to see if there is any change. 6. Compare the color of the indicator solution to the pH Color Chart to find out whether the solution is acidic, neutral, or basic/alkali 7. USING COMPLETE SENTENCES - fill out the lab sheet. You are welcome to add pictures of your experiment to your lab sheet with your explanations. 8. Submit completed lab sheet to CANVAS. Lab and images from www.middleschoolchemistry.com, chapter 10
|
To Clean Up Lab
Exemplary Extension to the LabBackground info:
Too much CO2 in the atmosphere can cause something called the greenhouse effect, which makes Earth and its atmosphere warmer. CO2 can also do something else, which you have seen in your experiments. Too much carbon dioxide can cause water to become too acidic. This can be a big problem for fish, aquatic plants, and especially coral. Pick one of the following questions to research and write a one page essay:
NOAA Ocean Acidification www.sms.si.edu/Newsletters/SMSNews_Winter_2013.pdf More information on pH and Oceans Your essay should be:
|
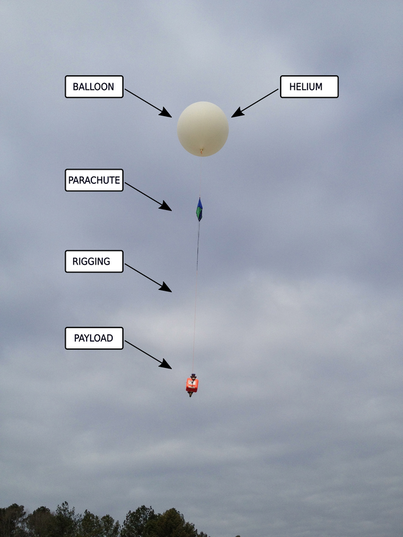
Helium Days for 1st PeriodOur Goal with this assignment is to apply everything we've been learning about Properties of Matter to understanding how Helium works and why it is a good gas to use in a weather balloon.
|
|
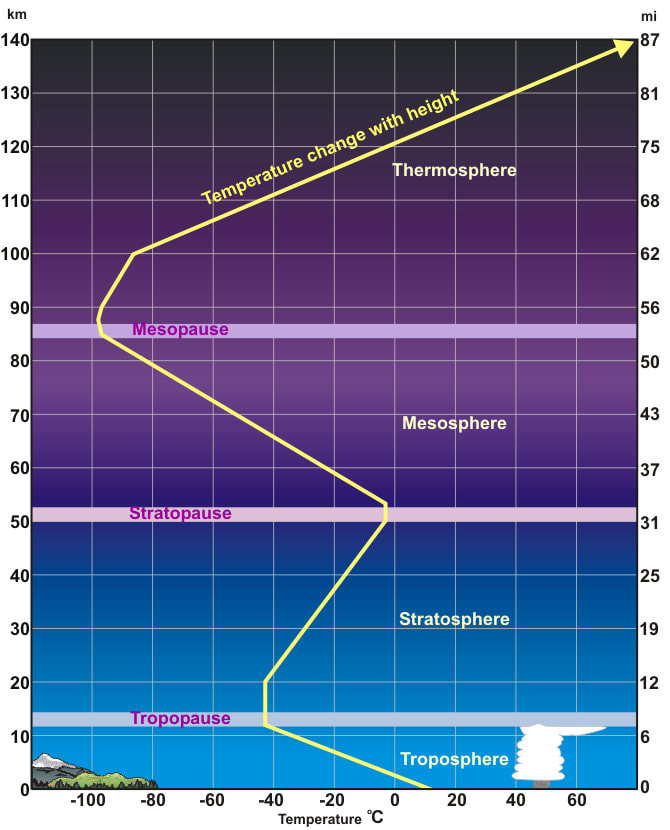
INDIVIDUALLY you have 2 days to research Helium and create either a Spark video or a PowerPoint presentation to answer the following questions:
1. What state of matter is Helium?
2. What are Helium's properties?
3. How does temperature affect helium?
4. Does Helium react to water (H2O)?
5. Does helium react to any elements found in the atmosphere?
6. Based on the information you've learned, at what altitude would you expect a weather balloon filled with helium to break?
7. Why is helium used in weather ballloons?
When answering questions, please include an explanation for your answer. This means including evidence, background information, explanations, etc. You need to demonstrate that you understand and can explain the answers in your own words.
Your presentation needs a title page, enough slides to thoroughly answer the question, a reference page (listing the resources you used), and images, diagrams, charts, graphs, etc. that further demonstrate your understanding.
You will be given a community grade, a learning process grade, as well as an academic mastery grade for your efforts. As mentioned previously, this is your final answer.
Here are the sources that you will use to find your answers:
Space.com
LiveScience.com
National Geographic
USA Today
High Altitude Science.com
NASA
Neon Days for 2nd PeriodOur Goal with this assignment is to apply everything we've been learning about Properties of Matter to understanding how Neon works and why it is used in signage.
|

|
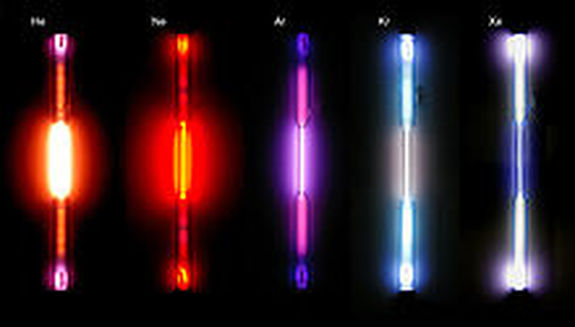
INDIVIDUALLY you have 2 days to research Neon and create either a Spark video or a PowerPoint presentation to answer the following questions:
1. What state of matter is Neon?
2. What are Neon's properties?
3. How does temperature affect neon?
4. Does Neon react to electricity? If so, explain.
5. Does Neon react to any other elements?
6. What color(s) does Neon create and why?
7. Why is neon used in signs?
When answering questions, please include an explanation for your answer. This means including evidence, background information, explanations, etc. You need to demonstrate that you understand and can explain the answers in your own words.
Your presentation needs a title page, enough slides to thoroughly answer the question, a reference page (listing the resources you used), and images, diagrams, charts, graphs, etc. that further demonstrate your understanding.
You will be given a community grade, a learning process grade, as well as an academic mastery grade for your efforts. As mentioned previously, this is your final answer.
Sources to use to learn about Neon and Neon Signs:
Periodic Table of the Royal Society of Chemistry
Live Science
Chem 4 Kids
Scientific American
Sciencing (Color)
Sciencing (Signs)
Cosmos
Edison Tech Center
Periodic Table of the Royal Society of Chemistry
Live Science
Chem 4 Kids
Scientific American
Sciencing (Color)
Sciencing (Signs)
Cosmos
Edison Tech Center
